Music washes away from the soul the dust of everyday life – Berthold Auerbach
Saying that people enjoy listening and creating music is an understatement. Why a certain mixture and sequence of sound waves at different frequencies & amplitudes (words optional!) should make us react – happy or sad, is a serious science question of course. While the Mozart kind may not need any initiation into music, exposure at early age can help children discover their love and passion for the same, benefiting generations in the process. As a society we short-change ourselves in the long run by denying adequate funding for arts in schools. But that is a separate discussion requiring a blog of its own. This is a technical article on some ways we can make it easier to learn music for young learners and also easier for teachers to reach them.
1. Background
During the Covid pandemic, remote learning became the norm – including for those students learning an instrument. Young learners depend on in-person instruction on the basics of playing an instrument until they gain enough expertise to read off of music sheets and fingering charts. Remote instruction here was not effective despite the best efforts of the teachers. There are two issues that needed to be addressed.
- Students: Learners benefit from repeat visuals of the instrument as the teacher played it – pausing, and moving back & forth as needed. Video recording the teacher’s example and sharing it can help but these files can get big and inconvenient for the teachers to produce, and students to download.
- Teachers: One-on-One instruction is more effective than a group setting especially when the class is remote. But this does not scale well as the extra time investment required on the part of the teachers makes it costly.
We illustrate a way here that can help mitigate both. The content of this post is mostly overview, motivation and examples. Due to length concerns, we will get to the implementation details in subsequent posts.
2. Automated Instrument Animation
This idea was part of a highschool science fair submission titled Remote Piano Instruction by Locally Rendering 3D Animations of Keys & Pedals from MIDI Files and it was accompanied by a bare-bones repository. We clone it here but limit ourselves to just the keys of a Keyboard. Before we get into the details, here is a sample end product of the effort. If you ever wanted to learn to play Mary Had a Little Lamb on a keyboard, hopefully the video below will be of some help.
A programmatic generation of such videos from a MIDI recorded performance is what we are talking about of course. Here is how it might transpire.
- The teacher plays the instrument hooked to a MIDI sequencer internal/external and records it as a MIDI (Musical Instrument Digital Interface) file.
- Execute either one of the options below.
- Teacher runs the application in this blog on the MIDI file and shares (like we do it here on YouTube) the resultant video with students.
- Teacher shares the MIDI file with the students and the students can run the application on their own. Sharing the MIDI file is a breeze as it is much, much smaller than the video (622 bytes vs 38 Mb). See the table below for a size comparison of various intermediate files produced in building the above video.
| File | Type | Content | Size |
| Mary_had_a_Little_Lamb.mid | MIDI | The midi messages | 622 Bytes |
| Mary_had_a_Little_Lamb.mid.wav | WAV | The raw sound wave synthesized from MIDI by using pyFluidSynth with FluidR3_GM.sf2 soundfonts | 6.6 Mb |
| Mary_had_a_Little_Lamb.mid.wav.mp3 | MP3 | The compressed MP3 from WAV. This is the audio in the Blender animation | 304 Kb |
| Mary_had_a_Little_Lamb.mkv | mkv | The video above at 100 frames/second | 38 Mb |
The animation helps the student learn the instrument offline at his/her own pace. The automated generation of the video saves teacher’s time as the examples get recorded as he/she plays. The examples can be reused across sessions, and new examples can be created on-the-fly. The increased efficiencies allow teachers to expand their reach and reduce the overall cost of music education. That is the hope anyway and the impetus behind the science-fair project.
Building and running this application is the content of this blog. As the application is centered around the 3D animation software Blender, uses sound synthesis libraries, and executes various python/shell scripts – it does assume some level of computer savviness on the part of the user. Perhaps unrealistic to expect all the music teachers and young pupils to pull it off on their computers. Ideally, the application should be hosted so users can drop a MIDI file and download the resultant video. There are some services that offer Blender in the cloud but that is future work. Going further, the MIDI software can perhaps be directly augmented to generate the animation video, along with the MIDI file. Well into the future I guess.
3. The MIDI
The key input to animation is the MIDI file representing the musical piece. MIDI file is not a digital recording of the audio. Rather, it is a codified list of instructions on generating sound waves from the instrument or instruments employed while recording the MIDI. If the MIDI recording is done on one piano and the same is played back on a different piano – the fidelity of the reproduced sound would be close, except for the difference in the quality of sound produced by the two pianos. The MIDI file can be edited and targeted to play on a different instrument (from the one it was recorded with) for interesting effects. Thus the MIDI standard allows for a lot of flexibility with music production, interoperability and sharing across MIDI hardware and software producers. How the MIDI instructions are to be interpreted by the software and hardware connecting to the target devices is spelled out in the MIDI specification from midi.org, a non-profit group.
For example the above simple piece was played on a single instrument (piano), and recorded as a MIDI – a binary file. The file when parsed (for example here with the excellent MIDO module in python) contains messages like below. This piece has 24 ticks/beat, and at a tempo of 600000 microseconds/beat each tick translates to 600000*1.0e-6 / 24 = 0.025 seconds
{ "type": "set_tempo", "tempo": 600000, "time": 0}, # tick = 0.025 seconds, time is #ticks
...
...
{ "type": "note_on", "time": 0, "note": 60, "velocity": 127, "channel": 0}, # note 60 (Key C4) pressed down
{ "type": "note_on", "time": 18, "note": 60, "velocity": 0, "channel": 0}, # Release C4 after 18*0.025 sec
{ "type": "note_on", "time": 0, "note": 62, "velocity": 127, "channel": 0}, # Press D4 after 0 sec
{ "type": "note_on", "time": 6, "note": 62, "velocity": 0, "channel": 0},
{ "type": "note_on", "time": 0, "note": 64, "velocity": 127, "channel": 0},
{ "type": "note_on", "time": 12, "note": 64, "velocity": 0, "channel": 0},
...
These messages clearly inform us as to when a certain key needs to be pressed and for how long. That is pretty much the core information needed to build the animation. At something like 100 frames/second, each frame is 0.01 seconds long and the movement of keys will be accurately captured for all practical purposes. In the unlikely event that a key is pressed and released multiple times within the span of 0.01 seconds, the whole movement will be treated as a single press/release event. But in any case the human eye can really only process visual data at about 60 frames/second.
3.1 MIDI to Sound
MIDI is not sound. But it has information on the exact set of frequencies (and amplitudes depending on how the ‘velocity’ information is interpreted) contributing to the sound heard at any instant. That is sufficient to reconstruct the sound, as sound is nothing but a summation of sine waves of all the attendant frequencies at any instant. We can do a quick & dirty conversion of MIDI to numerical data and save it as WAV file, ignoring the instrument part. For example, the six messages above give raise to a sound wave of the form y(t) below. As the velocity is at 127 in all cases, the same nominal amplitude of 1.0 is used.
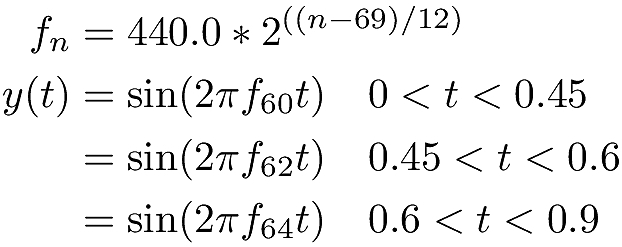
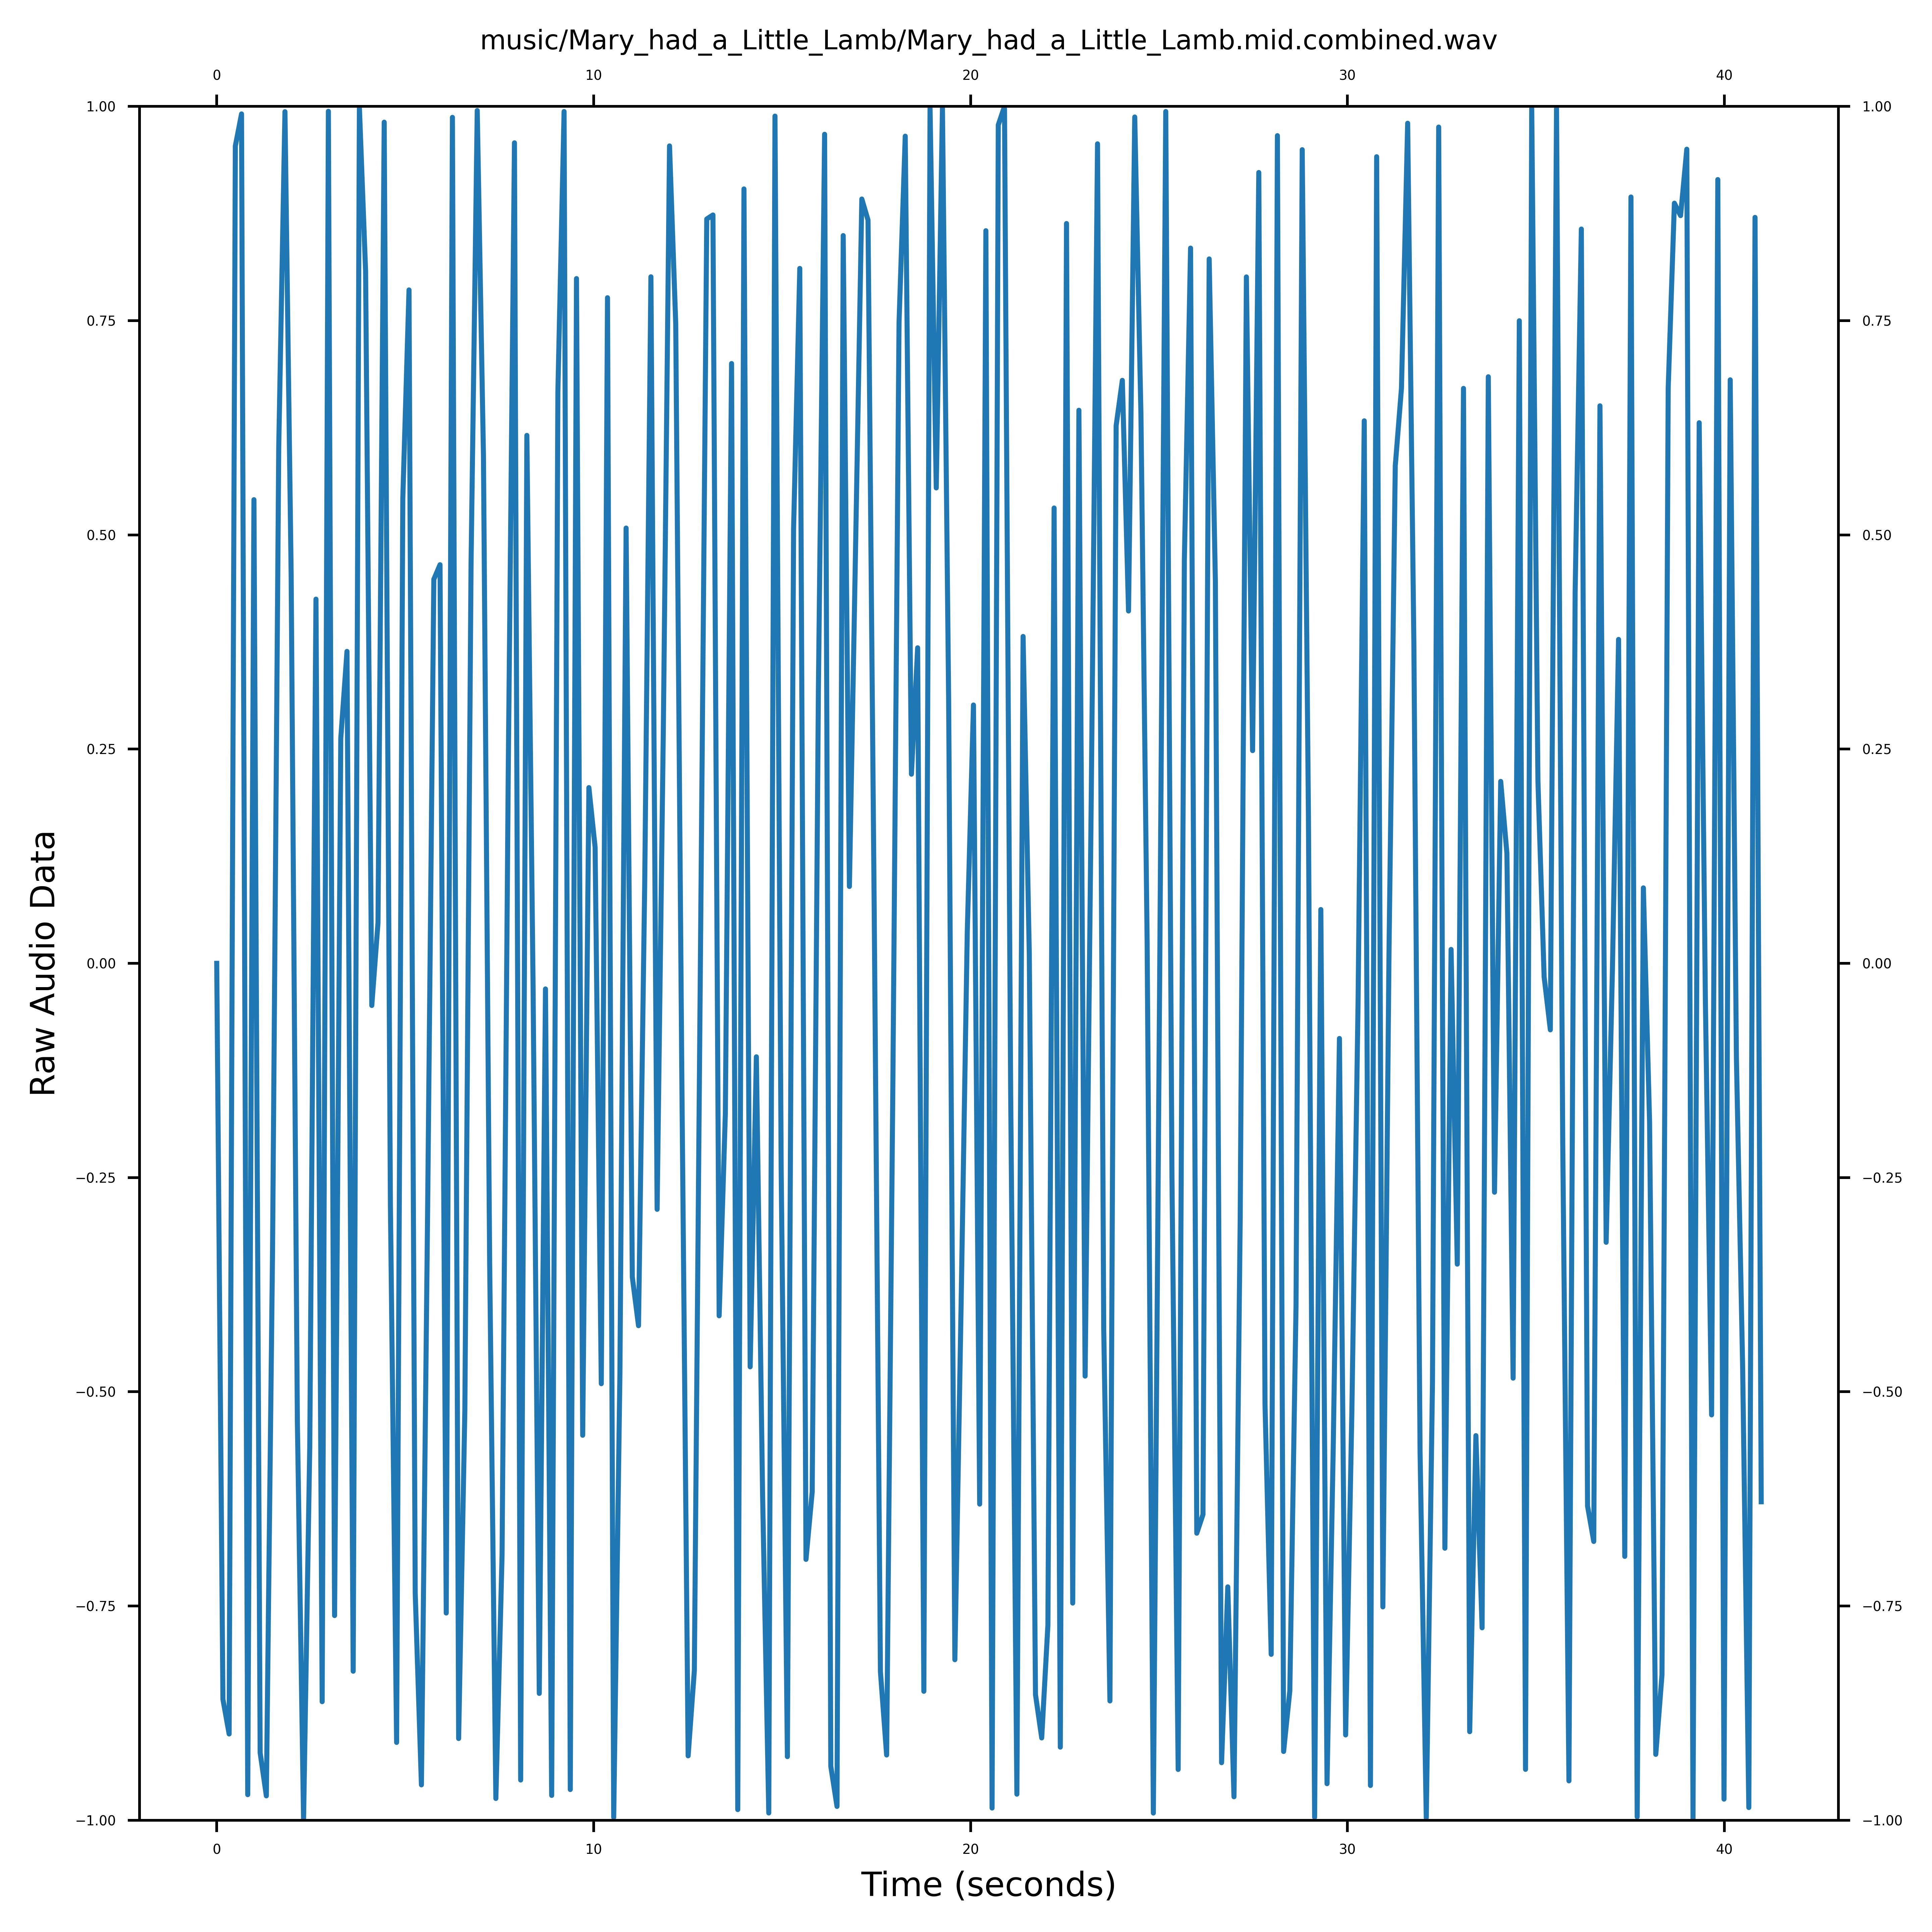
Here then is the full MIDI file converted to raw data extending the above formula for the entire time range of the piece. We can even play the WAV data file. Other than the pops and clicks which are artifacts of the audio subsystem, it does sound like the one in the video.
The above discussion is only meant to show that (a) sound is simply data, (b) MIDI has instructions in it to generate that data and, (c) a software intermediary is needed. In practice one would use the excellent fluidsynth package and soundfonts to convert MIDI to quality sound. Tools like timidity, VLC directly play a MIDI file, tapping into the same libraries. Python modules such as pyFluidSynth, pretty_midi and pydub allow for a programmatic conversion of MIDI to the more common mp3 format that we need for embedding into Blender for the audio part of the video. Driving the animation and sound with the same MIDI file keeps them in sync in the video.
Target Playback Instrument
We can even change the target instrument (that we ignored earlier in generating data from sine waves) and the appropriate soundfont would be used to generate sound with the right timbre. The channel number in a message refers to the instrument (also called as ‘program’ for whatever reason) to which the message is directed at. The MIDI spec allows for up to 16 channels (0-15), so at any given tick, it can simultaneously deliver messages to 16 instruments, each of which contributes to the overall sound heard at that tick. We have a single instrument here and so only one channel (0) is required. The target instrument for a channel can be changed with a program_change message and the messages will flow to that instrument instead. In the absence of a program_change message in the MIDI, the default program is 0 which refers to ‘Acoustic Grand Piano’. This was the case in the video above. If we wanted to target the same messages to say Flute, we update the MIDI file with the following message at the beginning (before any note messages) and assign channel 0 to program 73 which stands for Flute.
{ "type": "program_change", "time": 0, "program": 73, "channel": 0 },Listen to the same MIDI but now being played on a flute. We can build the automation once again with the updated MIDI. The only thing different would be the audio of course. Ideally the animation should feature a Flute where the holes open and close in sync with the tune. It is future work for an article say Learn Flute with Blender!
3.2 Sound to MIDI
Generating sound from a MIDI file is a deterministic process. That is, there is but one and only one sound wave that can result from combining the notes over each of their durations across whichever instruments in play. The reverse deconvolution exercise is much more challenging. One can only hope for approximate results. This is the domain of signal processing, Fourier Transforms and in particular Short Time Fourier Transform (STFT) that attempts to split a compound signal into component parts by frequency and as a function of time. Excellent modules such as librosa provide a number of utilities including STFT to work with sound signals.
This whitepaper by Tiago Tavares covers some background on this problem and possible solutions attempted over the years. For monophonic sound, his module sound_to_midi that implements Viterbi’s optimum decoding algorithm has worked reasonably well for me in some tests. Here is a result using this module to convert the same WAV/mp3 file in the video to MIDI. We do a round trip (MIDI_FILE => WAV_FILE => MIDI_FILE_GENERATED_FROM_WAV => WAV_FILE_GENERATED) to check if we can recover the original MIDI that produced the sound. Click on the links below to hear the original and recontructed sound.
| Original | After Round Trip |
| Play Mary_had_a_Little_Lamb.mid.wav | Play Mary_had_a_Little_Lamb.mid.wav-2048-512.mid.wav |
Even while there are some errors, the generated MIDI does ‘sound’ close to the original. While that is sufficient for practical purposes, a close examination of predicted/original notes, their onset times and durations is needed. Take a look at this paper/module mir_eval by Colin Raffel for a deep dive into evaluating Music Information Retrieval (MIR) systems.
4. Lakh MIDI Dataset
As the MIDI drives the whole animation, the quality of the MIDI file used is critical. There is fortunately a curated resource called Lakh MIDI Dataset (LMD) put together by Colin Raffel (also the author of pretty_midi and one of the authors of librosa).
Given that LMD features popular music, multiple instruments contribute to the overall sound. The MIDI can capture all that with its channels and program_change messages in a single track, or even across multiple tracks. Two tracks for example can accommodate a maximum of 32 different instruments. When there are not that many instruments we can dedicate a track to an instrument for easier editing and post-processing.
A MIDI file with multiple tracks can still be animated either separately with each track generating its own animation on hopefully the target instrument. Or simpler still, flatten all the notes across all instruments onto a single piano track and animate that. This flattened pianoroll can be readily produced by the pretty_midi module for example. It would of course be difficult to play and may not sound like the original due to the differences in timbre. Fun nevertheless!
We close this post by picking one of the MIDI files from the Lakh MIDI Dataset. It employs 12 instruments but we animate the flattened MIDI on a keyboard.
We can see that:
- At any instant multiple keys are in motion – the result of flattening multiple instruments onto a single keyboard
- The audio and animation are in sync – as they are both driven by MIDI
- MIDI is high quality. Despite the flattening – we can see that the beat, music and the attendant keys in motion are in pretty good harmony.